Sunday, September 4, 2011

Pulled Pork Recipe

I got an awesome recipe from my brother! I just had to try it right away!! Jim said he cooks the pork in his crock pot Saturday night, all night. In the morning, he shreds the pork & adds the BBQ sauce & then lets it cook for a little bit more. By the time football is starting, his pulled pork is ready to snack on for the rest of the day. Genius!!


Pulled Pork
**I got his recipe from my brother, Jim. It turned out so good! I did not include the onions or cloves. I think this may become a big hit on Sundays while watching the Carolina Panthers play football!**

4lb pork roast
2 onions, sliced, divided
1 onion, chopped
5-6 whole cloves
2 cups water
16oz bottle of your favorite BBQ sauce
salt & pepper

1. Place one sliced onion at the bottom of crock pot.
2. Stud pork roast with cloves and season with salt & pepper.
3. Place roast in slow cooker on top of the sliced onion. Cover with the second sliced onion and add enough water to fill crock pot 2/3 of the way.
4. Cover and cook on low 8-12 hours.
5. remove roast. Remove and discard cloves, bone and fat as well as any water, onions and grease remaining in pot.
6. Use a fork or fingers to pull roast apart and shred.
7. Return the pulled pork to crock pot. Mix in the chopped onion and BBQ sauce and cover.
8. Heat on high 1-3 hours or until onions are soft.


I cooked my roast Saturday night. Once I returned home from church, I shredded the pork & let the pork & BBQ sauce sit in the crock pot on "Keep Warm" for the rest of the day. Justin was working today so we didn't eat the pork until dinner time. It was delicious!

Saturday, September 3, 2011

Zoo Day!

College football has offically started which means, NO ONE in Alabama goes anywhere on Saturdays! This is good for us because we can go to the Birmingham Zoo & not have to fight crowds on a Saturday!

The Birmingham Zoo has 5 new lion cubs. The zoo is having a celebration since the lion cubs are now with their parents, on display. There was face painting & we got to see the "King of the Jungle" perform a bit.

Ready for some zoo fun!


Checking out the elephants!


The Lions!


My Lion! :)


Waiting in line to get the kid's faces painted.


David's Turn!


Grace's Turn!


Nanny bought each of the kids a lion stuffed animal.


BIG Lion!


We ate our lunch by the splash pad at the zoo. The kids loved playing in the water!


Of course, we had to go for a ride on the carosel!


Grace waving to Mommy! So cute!


My big kids!


Grace was NOT happy to get off!!


But then we went over to the play ground, & both kids were happy!


For dinner, I made pizzas. I used to the Honey Pizza Dough recipe.

Friday, September 2, 2011

A Trip to Nanny & Grandpa's House!

Nanny had an eye appointment this morning so she needed to drive back home yesterday for the night. Justin was working late Thursday night, so the kids & I packed ourselves up & went with Nanny to Montgomery. I am in a lot of pain! The pain medicine for my tooth doesn't do anything for me but make me feel loopy, which I do not like! I called the dentist this morning & he basically told me I will just have to ride out the pain. I am hoping to get some relief in the next couple days because I am having a hard time sleeping at night. Thank God my Mom is around to help with the kids!


Nanny has some play shoes for Grace at her house. Grace LOVES to walk (and sometimes run) in them around the house. Below Grace is sporting her night gown with her matching high heels!


After Nanny's eye appointment, we all headed back to Birmingham. We are looking forward to a fun filled weekend with Justin!

Wednesday, August 31, 2011

A long day...

Okay, today wasn't really long, just painful. I had a root canal done back in April. I am still having issues withe tooth so my dentist sent me to a specialist to have the root canal redone. Boy, I thought the first time around was painful but I was WRONG! I started to really hurt after the novocaine wore off. I am so thankful my Momma is here to help me with the kids & to make us dinner. I asked her before she came if she would make us scalloped potatoes with hot dogs. This is something my Mom made for us a lot growing up. I have made it a few times for my family but it always seems to taste better when Mom makes it! :)

Tuesday, August 30, 2011

Nanny Arrives!

My Mom arrived this afternoon! She is staying with us for the next week because my Dad is out of town for business. We haven't seen my Mom since our family beach trip a couple weeks ago, so I was very excited & happy to catch up with her! I decided I wanted to make something special for her. Pumpkin pie is her absolute favorite dessert! I found a recipe online for Pumpkin Crisp & decided, we had to try it & it would be a fun surprise for her when she arrives!


Pumpkin Crisp
**I found this recipe on allrecipes.com. It turned out so good! It tastes like pumpkin pie with a crumble topping! So Yummy!! It was really easy to make!**


1 package yellow cake mix
1 egg
1/2 cup butter, melted
1 (29oz) can pumpkin puree
2 eggs
1 tsp ground nutmeg
1 tsp ground cinnamon
1/2 cup white sugar
2/3 cup evaporated milk
3/4 cup white sugar
1/2 cup butter, softened

1. Preheat oven to 350 degrees.
2. Set aside 1 cup cake mix for the topping. Combine remaining cake mix, 1 egg, and melted butter or margarine. Pat into a 9x13 inch baking pan.
3. In a large bowl, mix pumpkin, 2 eggs, spices, 1/2 cup sugar, and milk. Pour pumpkin mixture over the cake mix crust.
4. In a small bowl, combine 1 cup cake mix and 3/4 cup sugar. Cut in 1/2 cup softened butter until mixture resembles coarse crumbs. Sprinkle mixture on top of pumpkin mixture.
5. Bake at 350 degrees for 55 minutes.


For dinner, I tried a new recipe called Taco Chicken Bowls. This is served over rice instead of on tortillas. This interested me. It turned out really good & everyone said they would like to have it again. :)


Taco Chicken Bowls
**I found this recipe on budgetbytes.blogspot.com. It turned out really yummy & everyone liked it. I left out the chili powder & cilantro. We are not big fans of cilantro & I bought medium salsa. We are not big fans of spicy food so the medium salsa made it plenty spicy for us.**

1 1/2 lbs chicken breasts
1 (16oz) jar salsa
1 (15oz) can black beans, drained
1/2lb (8oz) frozen corn
1T chili powder
1/2T cumin
1/2T minced garlic
1/2tsp dried oregano
1/4tsp cayenne pepper
1/4tsp salt
cracked pepper, to taste
2 cups dry rice
8oz shredded cheese
1/2 bunch cilantro (optional)

1. Add everything except the rice, cheese & cilantro to the slow cooker along with 1/4 cup of water. Give everything a good stir and make sure the chicken is covered in the mixture.
2. Secure the lid of your slow cooker and cook on low for 8 hours.
3. Near the end of the cooking time, cook the 2 cups of rice according to the package directions.
4. After 8 hours of cooking, carefully remove the lid of the slow cooker. Stir with a fork to shred the chicken. Build the taco bowls by placing rice on the bottom, then the taco chicken mix, shredded cheese and fresh cilantro.


Monday, August 29, 2011

Crazy Hair Bath Time!


Homemade Pretzel Bites

I finished up the homemade pretzel bites while the kids took their naps. They turned out so good! I wasn't sure how well they would turn out (I have never made pretzel before) but they are awesome! I gave them to the kids when they got up from their naps as an afternoon snack & they ate them up! After Justin gets home from work & gives them a try, I am going to put them in a ziplock freezer bag & freeze them. I will pop them out as we want them.

Homemade Pretzel Bites
**I found this recipe at dineanddish.net. They were really easy to make & are a big hit. Perfect afternoon snack or for while we are out running around town. The recipe tells you to put them in the pretzel shape but I rolled them into bite size balls...much easier for the kids to handle.**

1 1/8 cup water (70-80 degrees)
3 cups all-purpose flour
3 T brown sugar
1 1/2 tsp active dry yeast
2 qt water
1/2 cup baking soda
coarse salt
melted butter

1. In bread machine pan, place the first four ingredients in order suggested by manufacturer. Select dough setting (check dough after 5 minutes of mixing; add 1-2 tablespoons water or flour if needed).
2. When cycle is completed, turn dough onto a lightly floured surface. Divide dough into eight balls. Roll each into a 20-inch rope; form into pretzel shape. In a saucepan, bring water and baking soda to a boil. Drop pretzels into boiling water, two at a time; boil for 10-15 seconds. Remove with a slotted spoon; drain on paper towels.
3. Place pretzels on greased baking sheets. Bake at 425 degrees for 8-10 minutes or until golden brown.
4. Brush with melted butter. Sprinkle with salt.

Bread Machine Bread Sticks

You ever have one of those days where you just feel like cooking & making fun treats for your family? Well, I am having one of those days! I tried a new recipe this afternoon. I have never made bread sticks before but it was so easy! We will have these with our dinner tonight (grilled pork loin). Yummy! I am in the process now of trying to make pretzels in the bread machine. I will post about that later.


Bread Sticks
**I found this recipe at memoriesoncloverlane.blogspot.com. It was so easy to make & they are so yummy! I look forward to making these again!**

1 cup warm water
1/4 cup oil
3 cups bread flour
1 tsp salt
3 T brown sugar
2 1/2 tsp active dry yeast
4 T butter, melted
1/2 tsp garlic salt
Parmesan cheese

1. Put first 6 ingredients in bread machine in the order listed. Run dough cycle.
2. Roll dough onto a lightly buttered cookie sheet.
3. Use pizza cutter and cut the bread sticks into 24 pieces.
4. Let rise for 1 hour.
5. Bake at 375 degrees for 10-15 minutes.
6. When bread sticks come out of the oven, drizzle with butter/garlic mixture. Sprinkle with Parmesan cheese.
Serve with pizza sauce for dipping.

Homemade Egg McMuffins

This morning I made a little surprise for the hubby. I found a recipe for making your own Egg McMuffins. The recipe also talked about putting them in the freezer & taking them out when you are ready to eat one. That is my kind of cooking!

Egg McMuffins
**I found this recipe at macheesmo.com. The recipe called for grated cheese but I had a bunch of sliced cheese in the house so I used American cheese singles. I also had some sausage links in my freezer from a sale a few weeks back. I cooked some of them up & put 1 sausage link on each of the 6 muffins. This is a perfect breakfast for the husband. Before he runs out the door to work, he or I can heat one up & go!**

12 English Muffins
12 Large Eggs
10oz Cheese, grated
Butter or olive oil (optional)

1. Grease muffin tin lightly with oil spray or butter.
2. Crack an egg into each muffin tin. Bake in oven set at 350 degrees for 15-20 minutes.
3. Toast English muffins.
4. Add cheese and an egg to half of a muffin. Apply the top half of the muffin. Add a tiny smear of butter onto the top half of the muffin if you would like.
5. Stick back in the oven for 5-10 minutes until they are warmed through and the cheese is melted.
To Freeze: Don't stick back in oven. Place all on baking sheet and put them all in the freezer, uncovered and unwrapped. Leave for 1 hour. Pull them out and wrap individually in plastic wrap or foil and store in a freezer safe plastic bag.
To Reheat: Heat frozen in oven at 350 degrees for 25 minutes.


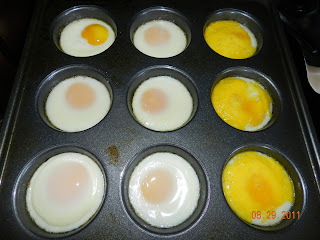
How my eggs looked after coming out of the oven. I tried to scramble three of the eggs to see how they would turn out. I prefer my eggs scrambled.


12 Egg McMuffins ready to freeze. The 6 on the left are egg and cheese. The 6 on the right are egg, cheese & sausage.


I wrapped all the sandwiches up individually with plastic wrap. I then (to save space in my small freezer) divided the sandwiches up & put the 6 egg and cheese muffins in one of the English muffin packages. I put the 6 egg, cheese & sausage muffins in the other English muffin package. I put a label on them & stacked them on top of each other in the freezer. Easy & doesn't take up much room in my freezer! :)


Homemade Dishwasher Soap

Today, I made my own dishwasher detergent!

I found the recipe online. From what I have read online, it lasts for a really long time & is much cheaper than buying name brand detergents. Of course, if I find a deal using my coupons & I can get dish detergent for free or really cheap, I won't pass up the deal! ;)

Here is how I made my own dish detergent...


3 cups of Epsom Salt
1 Box of Borax (20 mule team borax, found in any supermarket with the laundry detergent)
1 Box of Super Washing Soda (found in any supermarket with the laundry detergent & soaps)
24 packages of unsweetened lemonade mix
Large container to store

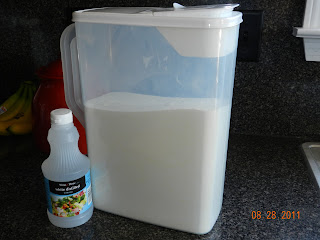
In a very large bowl, mix together all of the ingredients listed above. Once you have finished mixing it well, you can pour it into your container.


I bought my container at Super Walmart for $3. Make sure it is an air tight container to help keep the detergent from hardening.

You will use 1 TBSP per wash cycle.

If you need a rinsing agent then you can add 1 TBSP vinegar or Lemi Shine to the bottom of the dishwasher before starting it.

Here is a breakdown of the cost:
$2.98 1 Box of Borax
$3.24 1 Box of Arm & Hammer Washing Soda
$2.88 24 Packages of Unsweetened Lemonade
$3.49 1 Carton (4lbs) of Epsom Salt (I only used 3 cups so there is enough left to make more soap)
Total = $12.59


This is much more than I would spend on dishwasher detergent but only using 1 TBSP per washing cycle, this should last for a very long time!

Sunday, August 28, 2011

A 3 year old explains a rodeo...

We got home from the rodeo pretty late last night. This morning, on the way to church, I asked David what he thought about the rodeo. He said he loved it! Daddy asked David what he liked best.


David said he loved how "the horses come out of the gate & dance all over the place! The cowboys fall off because the horses are dancing so much. Then, the clown comes over & helps the cowboys when they fall off the dancing horses."


Love him!

Saturday, August 27, 2011

And they call this thing a rodeo!

We took the kids to a local rodeo tonight with some friends. The four of us have never been to a rodeo before so we were excited to see what it was like. We had a blast! Luckily, our friends are familar with rodeos so they were able to explain a couple things. David is really into Toy Story & the whole concept of cowboys. We had a real cowboy sitting in front of us & he was so nice. He talked to David & explained what was going on through the rodeo. The rodeo didn't start until 8pm so Grace was tired & wasn't real into it. We would definately like to go again!


My cowgirl!


Checking out her cowgirl boots!


David & his best buddy, Carter, walking up to the rodeo :)


Amber, Kennadi, Justin & Grace


Nate, Carter & David checking out a pretty horse (notice, David won't get too close!) haha


Just a couple of cowboys!


Practicing his country dancing!


Cowgirl Kennadi!


For dinner, I made honey-garlic pork ribs. I found this recipe in my Taste of Home cookbook. It turned out really yummy!
Honey-Garlic Pork Ribs
**The recipe comes from The Taste of Home cookbook.**

4 lbs pork spareribs or pork loin back ribs
1 cup honey
1 cup packed brown sugar
1/3 cup soy sauce
1/2 tsp garlic powder
1/2 tsp ground ginger
1 tsp ground mustard

1. Cut ribs into serving-size piecees; place in a large resealable plastic bag. Combine the remaining ingredients; pour half the marinade over ribs.
2. Seal bag and turn to coat; refrigerate for several hours or overnight, turning bag occasionally. Cover and refrigerate remaining marinade. Drain and discard marinade from ribs.
3. Place ribs on a rack in a greased shallow baking pan. Cover and bake at 350 degrees for 1 hour. Drain. Pour the reserved marinade over ribs. Bake, uncovered, for 30-45 minutes or until meat is tender, brushing occasionally with pan juices.

Tuesday, August 23, 2011

Mcwane Center Play Date

Today, we took Mimi & Pop Pop to the Mcwane Science Center. Pop Pop & Mimi have never been to Mcwane so we were excited to show them all about it!
My pretty girl!


Let's get wet!


Checking out the sharks & sting rays!


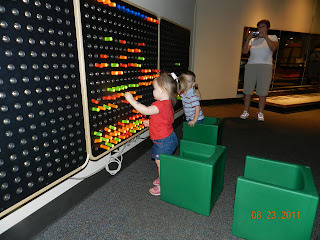
We love the giant light brite!


Let's play with blocks!


I love how her hair looks like a peacock! haha


Grace pretending to be a fairy...Tinker Bell is her favorite movie right now.


Slide Time!


Funny Kids!


David playing the drums.


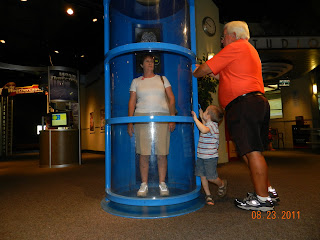
David showing Mimi that he can stand the winds of a tornado!

Mimi's turn!